Introduction to Developing vRealize Orchestrator Plug-Ins
The VMware vRealize Orchestrator 8.x Plug-In Development guide describes how you can use a model-driven framework to develop plug-ins for vRealize Orchestrator 8.x.
Developing Plug-Ins with Model-Driven
Model-driven is a framework that exposes the model of third-party libraries, which makes it suitable for creating plug-ins for specific integrations. Model-driven is included in the vRealize Orchestrator 8.x SDK.
| Protocol | Sample |
|---|---|
| HTTPS | https://github.com/vmware-samples/vrealize-orchestrator-plug-in-for-redis |
| SSH | [email protected]:vmware-samples/vrealize-orchestrator-plug-in-for-redis.git |
Integration with Redis
- Migrate or Upgrade your vRealize Orchestrator Appliance to version 8.0 or later.
- If you have vRealize Orchestrtor 8.4 or later, download and install the vRealize Orchestrator Plug-in SDK. ADD LINK
- If you are developing a plug-in
for vRealize Orchestrator 8.4 or later, verify that you have Java 11
installed.
- If you are developing a plug-in for vRealize Orchestrator 8.3 or earlier, verify that you have Java 8 installed.
- Verify that you are familiar with Redis. See the Redis home page.
- Download and install the Maven build tool. See the Maven Apache Project. The vRealize Orchestrator Plug-in SDK is compatible with Maven 3.5.4 or later.
- Verify that you are familiar with Spring IoC. See Spring IoC.
Integration with Redis
You can use the model-driven framework included in the vRealize Orchestrator SDK to create an integration with the Redis data structure project.
Prerequisites
- If you are developing a plug-in
for vRealize Orchestrator 8.4 or later, verify that you have Java 11
installed.
- If you are developing a plug-in for vRealize Orchestrator 8.3 or earlier, verify that you have Java 8 installed.
- Verify that you are familiar with Redis. See the Redis home page.
- Download and install the Maven build tool. See the Maven Apache Project. The vRealize Orchestrator Plug-in SDK is compatible with Maven 3.5.4 or later.
- Migrate or Upgrade your vRealize Orchestrator Appliance to version 8.0 or later.
- Verify that you are familiar with Spring IoC. See Spring IoC.
- If you have vRealize Orchestrtor 8.4 or later, download and install the vRealize Orchestrator Plug-in SDK. ADD LINK
Basic Plug-In Concepts
Plug-ins in vRealize Orchestrator rely on several key features.
Checkpointing
The checkpointing feature makes it possible for vRealize Orchestrator to store the state of a running workflow and resume the workflow run from where it stopped. Checkpointing occurs every time a workflow completes a step and switches to the next element.
For example, you can run a workflow that
calls another workflow, List path in guest, and then calls a
set result scripting element. When the workflow run switches
from the List path in guest workflow to the scripting
element, the engine creates a checkpoint by storing all input and output parameters
and variables.
The sample workflow verifies if a folder exists in the file system of a specified virtual machine.
The sample workflow includes four input parameters. Two of them are strings, one is a custom SDK object that derives from the vRealize Orchestrator vCenter Server plug-in, and the fourth one is a secure string.
In the current sample scenario, when the
List path in guest workflow step is finished, the engine
serializes the state of the workflow, which is called a token, and stores it in the
vRealize
Orchestrator database. When
the workflow run passes to the set result scripting element, the
engine deserializes the token and tries to resume the parameters and attributes that
are associated with the workflow.
Parameter types are serialized in a
different way. Serializing string types consists of storing and reading the value of
the string. However, VC:VirtualMachine is a scripting object that
contains data and methods, so serializing and deserializing it requires the use of a
plug-in.
Scripting objects, whose serialization and deserialization involve using a plug-in, are known as SDK objects or finders. Such finder objects are not serialized by value but rather by a reference.
The reference has two components – object
type, for example, VC:VirtualMachine, and object ID. The engine
delegates the deserialization of finder objects to a plug-in and calls that plug-in
by the prefix in the parameter name. The engine strips the VC
prefix from the VC:VirtualMachine parameter type and calls the
finder and the associated ID for type
VirtualMachine.
Finders
Custom SDK objects are defined by the
underlying plug-ins. Finders create the custom SDK objects and pass them to the
platform. The platform exposes an interface that includes three methods for
retrieving these objects - findById, findAll, and
findRelation.
In the previous checkpointing example, on
every checkpoint, the engine invokes the findById method to restore
the object. If you set a property to the virtual machine from the example, without
storing this property on a third-party system, the next checkpoint retrieves a new
object from the platform but does not save the assigned property. This means that
the platform retains only a reference to the custom SDK object, without serializing
the objects.
Migrating plug-ins with branching
You can migrate your project and save any workflows that you modify in an up-to-date format. You'll also begin to use the newest version of the Plug-in SDK. If you still want to have support for 7.x you can branch your project.
Prerequisites
- Verify that you are running vRealize Orchestrator 8.x.
- If your project does not depend on
internal vRealize Orchestrator Maven libraries which are not distributed with
the SDK, you can install the new SDK and delete the
repositories and
pluginRepositories sections from the
pom.xml file.
You should also move to the usage of an isolated ClassLoader for your plug-in. For more information see, ClassLoaders in the VMware vRealize Orchestrator 8.x Plug-In SDK Guide. If you do depend on libraries not distributed with the Plug-in SDK, it is recommended that you to find an alternative to those libraries. If this is infeasible, then you can still use the Maven repository by changing the repositories URLs to point to your new vRealize Orchestrator installation (use the DNS names, everything else should stay the same).
Procedure
Migrating plug-ins without branching
You can modify your workflows while having support for 7.x without branching.
Prerequisites
- Verify that you are running vRealize Orchestrator 7.6.
Procedure
FIPS Supported Ciphers
As of version 8.3, vRealize Orchestrator can be run in FIPS-compliant mode and in non-FIPS mode. In non-FIPS mode, the security provider used is SUN (and SunJSSE), while in FIPS mode the security provider is BCFIPS. If your plug-in uses the providers from the platform, the supported cipher suites are restricted by these providers.
- TLS_DHE_DSS_WITH_AES_128_CBC_SHA
- TLS_DHE_DSS_WITH_AES_128_CBC_SHA256
- TLS_DHE_DSS_WITH_AES_128_GCM_SHA256
- TLS_DHE_DSS_WITH_AES_256_CBC_SHA
- TLS_DHE_DSS_WITH_AES_256_CBC_SHA256
- TLS_DHE_DSS_WITH_AES_256_GCM_SHA384
- TLS_ECDHE_ECDSA_WITH_3DES_EDE_CBC_SHA
- TLS_ECDHE_ECDSA_WITH_AES_128_CBC_SHA
- TLS_ECDHE_ECDSA_WITH_AES_128_CBC_SHA256
- TLS_ECDHE_ECDSA_WITH_AES_128_GCM_SHA256
- TLS_ECDHE_ECDSA_WITH_AES_256_CBC_SHA
- TLS_ECDHE_ECDSA_WITH_AES_256_CBC_SHA384
- TLS_ECDHE_RSA_WITH_3DES_EDE_CBC_SHA
- TLS_ECDHE_RSA_WITH_AES_128_CBC_SHA
- TLS_ECDHE_RSA_WITH_AES_128_CBC_SHA256
- TLS_ECDHE_RSA_WITH_AES_128_GCM_SHA256
- TLS_ECDHE_RSA_WITH_AES_256_CBC_SHA
- TLS_RSA_WITH_AES_128_CBC_SHA
- TLS_RSA_WITH_AES_128_CBC_SHA256
- TLS_RSA_WITH_AES_256_GCM_SHA384
- TLS_RSA_WITH_AES_128_GCM_SHA256
- TLS_RSA_WITH_AES_256_CBC_SHA
- TLS_RSA_WITH_AES_256_CBC_SHA256
- For FIPS-compliant mode, see https://downloads.bouncycastle.org/fips-java/BC-FJA-(D)TLSUserGuide-1.0.9.pdf
- For non-FIPS mode, see https://docs.oracle.com/en/java/javase/11/security/oracle-providers.html#GUID-7093246A-31A3-4304-AC5F-5FB6400405E2
If you decide to use a separate ClassLoader and different implementation of the security provider, then you might be restricted from the java.security settings that vRealize Orchestrator uses.
jdk.tls.disabledAlgorithms=SSLv3, RC4, MD5withRSA, DH keySize < 768, EC keySize < 224 jdk.tls.legacyAlgorithms= K_NULL, C_NULL, M_NULL, DHE_DSS_EXPORT, DHE_RSA_EXPORT, DH_anon_EXPORT, DH_DSS_EXPORT, DH_RSA_EXPORT, RSA_EXPORT, DH_anon, ECDH_anon, RC4_128, RC4_40, DES_CBC, DES40_CBC, 3DES_EDE_CBC
Create the Skeleton of the Plug-In
You can use the Maven archetypes to develop a plug-in.
Procedure
What to do next
File Structure
The home folder of the plug-in contains five Maven modules.
| Folder | Description |
|---|---|
| o11nplugin-redis | The o11nplugin-redis folder contains the plug-in deliverables. |
| .dar archive |
|
| .vmoapp file |
|
| vso.xml descriptor file |
|
| Images folder | Contains icons that you can associate inventory objects with. |
| o11nplugin-redis-core | The o11nplugin-redis-core folder contains
implementations that are related to the persistence, inventory objects and their
mutual relations, scripting objects, caching, unit tests, and others. The
o11nplugin-redis-core folder also includes the
PluginAdaptor class, which is the entry point for the
plug-in, and PluginFactory, which is a method of finding
inventory objects but model-driven does not use this method. |
| plugin.xml file | The plugin.xml file is a spring configuration file. This file defines a set of beans for the model-driven framework. |
| o11nplugin-redis-custom | The o11nplugin-redis-custom folder is essential for the model-driven-based plug-ins because it stores all scripting objects and their finders. |
| CustomModule.java file |
In the CustomModule.java file, you apply modifications to the vso.xml descriptor file. public CustomModule() {
this.plugin = new Plugin();
plugin.setApiPrefix("Redis");
plugin.setIcon("default-32x32.png");
plugin.setDescription("Redis");
plugin.setDisplayName("Redis");
plugin.setName("Redis");
plugin.setPackages(Collections.singletonList("o11nplugin-example-package-${project.version}.package"));
plugin.setAdaptorClassName(com.vmware.o11n.plugin.redis.RedisPluginAdaptor.class);
}
In this file, you define the name
and the prefix of the plug-in, and the content of the
.package file. Here you also define the
|
| CustomMapping.java file | This is the Java class that contains all scripting objects, singleton objects, and finders of the plug-in. In the CustomMapping.java file you bind all dynamic parts of the plug-in. |
| o11nplugin-redis-gen | The o11nplugin-redis-gen folder stores all the generated code. You do not use this module for building the Redis integration plug-in. The pom.xml file in this folder contains a custom Maven plug-in. |
| o11nplugin-redis-package | The o11nplugin-redis-package folder includes the text representation of the plug-in, such as workflows, actions, resource elements, configurations but without their corresponding binary files. |
| HelloWorld.xml file | The HelloWorld.xml file is a sample workflow text representation file. |
Deploy a Plug-In
After you confirm that the plug-in built is successful, you upload the plug-in to the vRealize Orchestrator server.
Prerequisites
Procedure
- Log in to the vRealize Orchestrator Control Center as root.
- Select Manage Plug-Ins.
- Click Browse.
- Navigate to the o11nplugin-redis.vmoapp file that is located in the {plug-in-home}/o11nplugin-redis/target directory.
- Click Upload.
- To install the plug-in, click Install.
- Log in to the vRealize Orchestrator Client.
- Navigate to the Inventory page and verify that the plug-in is listed there.
What to do next
Change the Plug-In Icon
You can customize the plug-in further, for example by changing the plug-in icon that appears in vRealize Orchestrator Control Center and in the vRealize Orchestrator Client. You do this by modifying the plug-in descriptor file.
Procedure
Create a Scripting Object
Besides changing the basic plug-in configuration options, you can add some code that makes the plug-in complete a task. You can create a scripting object and statically invoke its methods, by using a scripting singleton.
Procedure
Add an Endpoint Configuration
Most vRealize Orchestrator plug-ins require an endpoint configuration. An endpoint is a location where the plug-in stores connection details for the instances, with which vRealize Orchestrator communicates.
Procedure
Create a Workflow
After you install the Redis plug-in and install it on your vRealize Orchestrator server, you can create workflows. This procedure provides an example of how to create a workflow that requires three input parameters: a name, a host name, and a port.
Prerequisites
- Build a Redis plugin.
- Install the plug-in on your vRealize Orchestrator server.
Procedure
Export the Content
After you install a plug-in in vRealize Orchestrator, you can create and run workflows. If you want to include these workflows in the plug-in package, you must export the content of the workflows to the plug-in project.
Procedure
Results
You have added new content to your plug-in project. To add more content, add this content to the plug-in package, and run the mvn import command.
Inventory Object Interfaces
With the Redis plug-in, you can store connections and make them visible in the plug-in inventory. Model-driven defines three types of interfaces that you can use to display objects in the plug-in inventory.
| Interface | Description | Use |
|---|---|---|
ObjectRelater |
Describes the relation between two model objects. | In the example presented in step 2 of the Add an Endpoint Configuration procedure, this class holds the code that lists all virtual machines by their location. |
ObjectFinder |
Finds objects of a certain type by ID or by using a query. | Finders are a key concept in plug-in development. You use finders in plug-in checkpointing. See Basic Plug-In Concepts. |
Extension |
Extends the functionality of a model object. | You can add methods and fields to model objects in your code repository. If
you expose model objects that derive from third-party libraries, you must wrap
these objects and delegate calls to the wrapped object. Note: Model-driven does this
wrapping in a transparent way. |
Add Inventory Objects
If you want to define the Connection class as a finder object, you
must create a finder object that implements the ObjectFinder interface.
This exposes the object as a scripting object but does not add it to the inventory
tree.
Procedure
Create a Redis Connection Workflow
Create a workflow that connects to the Redis plug-in.
Procedure
Wrap the Client
To create the integration with the third-party system, for which you design the plug-in, you must add the Maven dependencies.
You introduce a dependency with a small Java-based client called Jedis and the Apache common pool library, on which the Jedis library depends.
Procedure
Important Notes on the Jedis Code
The Jedis implementation initializes only when you attempt to perform an operation
over the Connection object. This type of initialization is useful when you
manage thousands of connections.
When you destroy a connection, you must destroy all related resources. To prevent a state
of inconsistency, the destroy and the getPool methods
are synchronized.
You must explicitly close the Jedis
connection. For example, if you use the ping method, you retrieve a
connection from the pool, run a call and close the connection, by returning it to the
pool. If you want to run multiple calls, you must retrieve a connection multiple times.
For performance reasons, you can expose the Jedis object to the users.
Create a Testing Redis Connection Workflow
After you add the Jedis functionality to the Connection object, you
can use this functionality by creating a workflow.
Procedure
Additional Relations
Redis is a data structure store and therefore you can use it as a database. In Redis, there can be multiple databases identified by a number and the number of the default database is 0.
Jedis jedis = getPool().getResource();
jedis.select(3); //Selects database with index 3
jedis.set("plugin:tutorial", "Using another database");
You can add to the plug-in the option to select a database that is different from the default one. To achieve this, you can use either of the two available methods.
| Method | Description |
|---|---|
| Expose database index as part of the scripting API. | When a user calls a set method, for example, they can pass
the database index as an extra function argument. |
Present a new inventory object, Database, that wraps the
index. |
You must move all current methods from the Connection to
the Database model object. |
The following diagram displays the model of the second method.
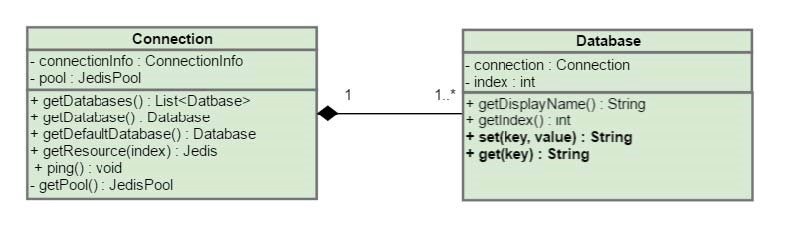
You define the Database
object in the model package. The Database object that
you invoke instead of get, set or other methods,
includes the following code.
package com.vmware.o11n.plugin.redis.model;

import com.vmware.o11n.sdk.modeldriven.extension.ExtensionMethod;
import org.springframework.util.Assert;
import redis.clients.jedis.Jedis;

public class Database {
    private final Connection connection;
    private final int index;

    public Database(Connection connection, int index) {
        Assert.notNull(connection, "Connection cannot be null.");
        Assert.isTrue(index >= 0, "Index must be a positive number.");


        this.connection = connection;
        this.index = index;
    }
    public String getDisplayName() {
        return "db" + index;
    }
    public int getIndex() {
        return index;
    }
    @ExtensionMethod
    public String ping() {
        try (Jedis jedis = connection.getResource(index)) {
            return jedis.ping();
        }
    }
    @ExtensionMethod
    public String set(String key, String value) {
        try (Jedis jedis = connection.getResource(index)) {
            return jedis.set(key, value);
        }
    }
    @ExtensionMethod
    public String get(String key) {
        try (Jedis jedis = connection.getResource(index)) {
            return jedis.get(key);
        }
    }
}
The Connection object also
requires some changes. Some of them consist in removing methods, such as
get, set, and append.
@Component
@Qualifier(value = "connection")
@Scope(value = "prototype")
public class Connection implements Findable {
    private static final int DEFAULT_REDIS_DATABASE_INDEX = 0;

    /*
     * The connectionInfo which stands behind this live connection.
     */

    private ConnectionInfo connectionInfo;
    private Map<Integer, Database> databases = null;
...
    public List<Database> getDatabases() {
        if (databases == null) {
            databases = new HashMap<>(16);
            //Issue a call to Redis, to see how many databases are configured, default is 16
            List<String> configs = getResource(DEFAULT_REDIS_DATABASE_INDEX).configGet("databases");
            int numberOfInstances = Integer.parseInt(configs.get(1));
            for (int index = 0; index < numberOfInstances; index++) {
                databases.put(index, new Database(this, index));
            }
        }
        return new ArrayList<>(databases.values());
    }

    @ExtensionMethod
    public Database getDatabase(int index) {
        return getDatabases().get(index);
    }

    @ExtensionMethod
    public Database getDefaultDatabase() {
        return getDatabase(DEFAULT_REDIS_DATABASE_INDEX);
    }
...
}
The modified Connection
model initializes a map of database instances. You can find a database by its index. The
getDatabases() method invokes a configuration command against the
Redis instance and retrieves the count of the supported database instances. By default,
the number of supported instances is 16.
You use CustomMapping to add
a relation between a Connection object and a Database
object.
    @Override
    public void define() {
      //@formatter:off
...
        wrap(Database.class).
            andFind().
            using(DatabaseFinder.class).
            withIcon("database.png");
...
        relate(Connection.class).
            to(Database.class).
            using(ConnectionHasDatabases.class).
            as("databases");
      //@formatter:on
    }
}
Finder implementation and a new
Relater implementation.public class DatabaseFinder implements ObjectFinder<Database> {
@Autowired
private ConnectionRepository connectionRepository;
@Override
public Database find(PluginContext ctx, String type, Sid id) {
Connection connection = connectionRepository.findLiveConnection(id);
if (connection != null) {
return connection.getDatabase((int) id.getLong("dbid", 0));
}
return null;
}
@Override
public List<FoundObject<Database>> query(PluginContext ctx, String type, String query) {
//Return null for now
return null;
}
@Override
public Sid assignId(Database obj, Sid relatedObject) {
return relatedObject.with("dbid", obj.getIndex());
}
}
Although the finder of the
Database object is similar to ConnectionFinder,
some major differences exist between these finders. While the
Connection object is related to the root of the inventory tree and
does not have a parent object, the Database object is a child object of
the Connection object. When you invoke the assignId
method, the relatedObject argument is the ID of the parent object, or
the ID of the Connection object. You can track a child object by the ID
of its parent object.
The relatedObject.with("dbid",
obj.getIndex()); implementation creates a new ID based on the connection
ID. The Database object ID includes the Connection
object ID and the index of the database instance. By using this method, you identify a
single database instance among all Connection objects.
The following diagram shows the relations between several layers of objects and their corresponding IDs.
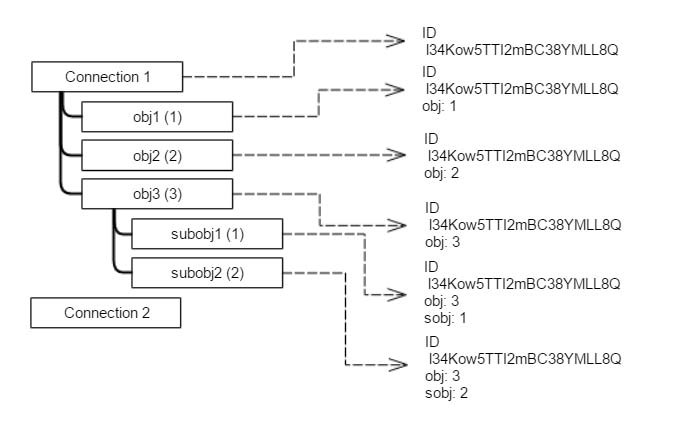
For example, Connection 1
has an ID l34Kow5TTI2mBC38YMLL8Q. Connection 1 also
has sub objects: obj1, obj2 and obj3,
whose natural IDs are 1, 2, and 3 respectively. obj3 has a set of
subobjects, namely subobj1 and subobj2.
There are three types of objects, so you need
three finders – for Connections, for obj and for
subobj objects.
The assignId method for the
connection returns only the ID of the connection. The assignId method
for the finder of the first-level objects, obj, returns the ID of the
connection and the ID of the obj. The assignId method
for the finder of the subobj objects returns the ID of the parent
object and the ID of the subobject.
A structure, similar to a map, stores the values of the ID for each object.
Connection object.Defining the finder of the
Database object is not enough to show the database objects in the
inventory tree. By using CustomMapping, you must define the parent
object of the Database object and pass it to the vRealize
Orchestrator platform. By introducing the
ConnectionHasDatabase class, you can find a set of databases for a
certain connection.
public class ConnectionHasDatabases implements ObjectRelater<Database> {


    @Autowired
    private ConnectionRepository connectionRepository;


    @Override
    public List<Database> findChildren(PluginContext ctx, String relation, String parentType, Sid parentId) {
        Connection connection = connectionRepository.findLiveConnection(parentId);
        if (connection != null) {
            return connection.getDatabases();
        }
        return Collections.emptyList();
    }
}
Similarly to using the
ConnectionFinder class, when you know the ID of the
Connection object, which is a parent object, you can use
ConnectionRepository to find the connection instance. To retrieve
the result, you must invoke the getDatabases() method.
If you run the workflow from the Wrap the Client section, you receive the following error message: TypeError: Cannot find function set in object DynamicWrapper (Instance) : [RedisConnection]-[class com.vmware.o11n.plugin.redis_gen.Connection_Wrapper] -- VALUE :.
connection.defaultDatabase.set("plugin:tutorial", "Testing redis connection - success");
var result = connection.defaultDatabase.get("plugin:tutorial");
System.log(result);
The modified workflow uses the same
Redis:Connection connection parameter but retrieves the default
database.